Vegan Pho
We love Pho (pronounced as Fuh) and eat it nearly weekly, mainly as a lunch thing but no one in this house would say no to it for dinner either. Pho is a Vietnamese Soup with rice noodles, traditionally it’s a beef broth and they do a chicken version but since going WFPB and then Vegan we had to develop a delicious vegan version.
It was a a bit of an end to an era not going to our local Pho restaurant we went to nearly every week of the year. It was a small family run business and their predominantly served dish was the Pho Bo (beef pho).
We have hunted around and found some good vegan versions in restaurants, some not so good, the quality and flavour can vary quite significantly.
There is however nothing like making it yourself if you find a good recipe that suits your taste buds. I’ve made allot of versions of this and Pho broth is a very personal choice.
Over time you should tweak this recipe to your liking, I’m fond of the flavour the cardamon brings to the soup so if it’s a bit much then ease it off. I also like using Cardamon seeds when I find them, they’re just a bit more direct but the pods are fine, they need a bit of punding to bruise the seeds inside the pods.
VEGAN PHO RECIPE
This makes a large batch, suitable for 5 large or 6 medium serves. A serve for a decent size bowl is about 600mL of broth. This 4L boils down to about 3L so about 5 serves, about 1L is lost in cooking/tasting. Any leftovers get consumed the next day in our household without fail. You can simply halve this recipe to make a smaller quantity, or double it to make a larger quantity. Alternatively, if you have the freezer space, make a big batch and freeze half, very convenient to have Pho on hand as this takes a day or so to make if you let the flavours mature appropriately.
To ensure this is Gluten Free check your Hoisin, Chilli sauce or if you happen to use soy sauce at all for containing gluten. Most of the common versions of these are founded on soy sauce which has used wheat in the process.
Broth Ingredients
- 4L water
- 17 Dried Shitake Mushrooms (not small ones)
- 4 Tablespoons Massel Plant Based Beef Style Stock
- 1 large brown onion, peeled and quartered
- 3 star anise
- 8-10 cloves
- 1 teaspoon cardamon seeds (or 8-10 pods crushed)
- 1/2 teaspoon dry flaked garlic
- 1/2 teaspoon coriander seeds
- 1/8 teaspoon chilli flakes (optional)
- 2 cinnamon sticks broken into 2 pieces each (not mandatory to break them up)
- 1 tablespoon shitake powder (optional – see notes)
Other Ingredients
- Packet of rice noodles (1cm thick type)
- Konjac Noodles as a low carb version instead of rice noodles
- Small bunch Thai Basil
- Birds eye chilli (1 small) depending on how many people like chilli
- Packet of bean sprouts
- Very thin slices of a halved brown onion (about 1-2 thin slices per serving)
- Vietnamese mint
- Tofu (firm or fried/puffed)
- Hoisin sauce (check it’s Gluten Free if this is important to you)
- Chilli sauce
- Spring/Green onions, chopped finely (optional)
- Cauliflower chopped into small florets (optional), blanched briefly
- Green Cabbage, chopped into 2cm square pieces and the layers separated, blanched briefly
- Baby corn, charred (optional, provides something visually different)
METHOD
Making the broth
- If you have a gas stove, using tongs, char the onion slightly over the open flame of a burner, this isn’t mandatory at all but it can add to the overall flavour. Otherwise add it in with the spices being roasted to char the onion a bit.
- Place the star anise, cloves, cardamon, garlic, coriander and cinnamon into the pot over high eat to toast the spices. They can char but not burn. If they start to smoke then you are done, you will notice them getting very aromatic, this is what you are after, it sort of activates them a bit and starts releasing some of their oils. (Tosting the spices is OPTIONAL by the way. Allot of times when I make this I don’t bother, I just sling them all in a spice bag (sachet d’épices – sounds so cool) as per below. I do always char the onions though, but I have a gas stove.
- Once the spices are toasted, tip them into a smaller bowl to make them easier to handle. Place the toasted spices into a small spice bag (sachet d’épices) to keep them together. This isn’t mandatory as the broth gets strained later but sometimes it just makes it a bit easier. It works for me because I leave the sachet d’épices in the strained soup to impart a bit more of whatever it has left in it.
- Leave the heat on and tip the water in. This stops the toasting process in its tracks if you’re not bagging them.
- Add in the dry shitake mushrooms, stock and onion if it isn’t already in.
- Bring to a boil and then set on a simmer with the pot covered (lid on) for 2-3 hours, I go for 3hrs just to give it a good long soak. This loses about 1L of liquid through steam and…. tasting.
- When done, turn the heat off and let everything come down to room temperature with the lid on, unless you are eating this straight away in which case proceed with the next steps with caution as everything is hot.
- Strain (about 1-1.5mm holes in the strainer) the bulk of the soup off into another pot or container, this reduces the liquid volume and enables you to pick mushrooms out and wash them off in the remaining broth.
- Remove the shitake mushrooms from the broth washing off any solids. I fish around with tongs or use tongs and a slotted spoon. Transfer them to a chopping board and cut the stalks off. Sounds like a waste but they are a bit hard and woody usually. I generally eat the stalks after cutting them off so they don’t got to waste but they can be a bit nasty sometimes.
- Slice the shitakes coarsely, I slice a 3-4 cm shitake into 3 pieces depending on your eating, bite size preferences. You can even leave some whole to dress the top of the soup if you wish, people will just have to bite them into pieces whilst using chopsticks.
- Strain the remainder of the broth using a medium (1-1.5mm or so) strainer. I only use a medium as I don’t mind a bit of sludge in the broth but if you want it clearer then use a finer strainer.
- Compost the onions and other solids that come off in the strainer. If you haven’t used a spice sachet then biff the spices too that will now be sitting in the strainer.
- You should be left with a wonderful tasting broth and some sliced rehydrated shitake mushrooms.
- I return the spice sachet to the cold broth for 12-24 hours or until the soup is gone.
- This broth is better if let stand for a day or so. It develops a bit more flavour. It is great to eat straight away but I make it a day or two in advance and leave it in the fridge. Then you just reheat it for about 10-30 mins before you want it. You can use the microwave as well, that works perfectly for a one or 2 person serve reheat.
- The broth may taste too strong at this point, that is ok, as by the time we add unseasoned noodles, tofu etc. then they all dilute the flavour level down a bit so you get it too washed out or it will be a bit bland.
- It can be eaten straight away (in which case don’t let it cool) or the soup can be refrigerated for 3-5 days and bring it to a boil when you are ready to eat it.
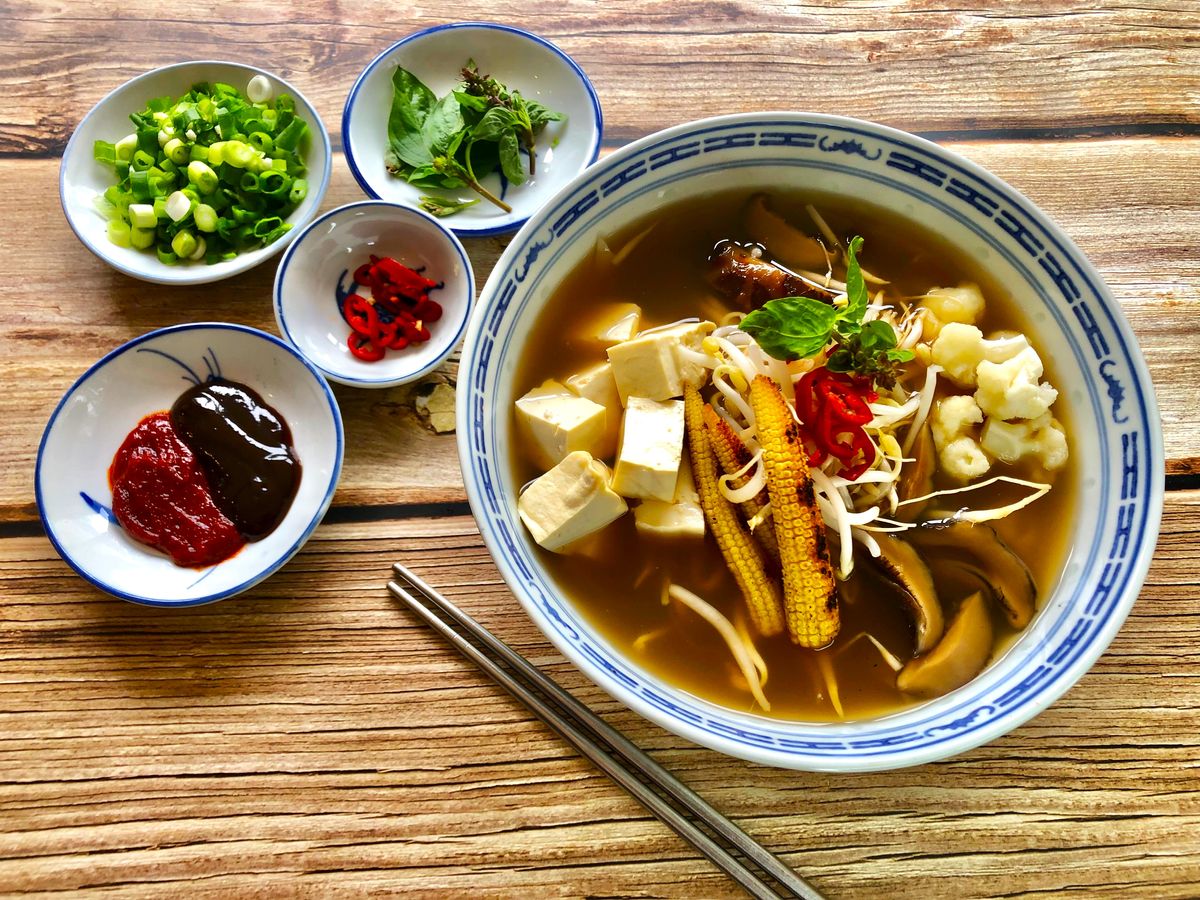
The Other Ingredients
- Soak the dry rice noodles in boiling water for about 10 minutes and then drain.
- Cut the tofu into 1.5m cubes. Try to size them as a single bite for each piece.
- VERY THINLY slice the extra brown onion, not the onion that cooked in the soup. Most of that will have disintegrated. These translucent thin pieces of onion will essentially cook in the hot soup and add minor texture and flavour. You are only adding 1-2 slices to each serve or as you see fit cause I add more.
- Chop across the birds eye chilli making pieces about 1-2mm thick, add these to a small sharing condiment bowl.
- Prepare a shared plate of Vietnamese mint, thai basil and bean sprouts.
- Prepare individual or shared dipping bowls with half chilli sauce and half hoisin sauce, or just go straight hoisin sauce.
If you add other ingredients suggested such as cauliflower or cabbage then manage down the quantity of tofu and mushrooms in each bowl or will all be a bit big and a bit crowded.
Assembling the Soup – Help yourself
- Prepare deep bowls, warm them if they are cold. Our bowls are generally 6-7cm deep and about 20cm across, they would easily hold a litre of liquid with no solids;
- Reheat the soup if it’s been in the fridge, bring it to a boil for a minimum of 5 minutes;
- Place a handful of rice noodles in the bottom of each bowl;
- Ladle the soup into each bowl filling it to about 2/3rds full or measure out 600mL;
- Ensure each bowl gets 3 full shitake mushrooms so about 9 of the slices;
- Add 6-10 pieces of tofu if using 1.5cm cubes, I do a block per bowl which is about 5-6cm square and about 2cm deep so these become 9, 12 or 16 pieces per block depending on how you slice them. If you’ve used slightly larger or puffy/fried tofu and have them in larger pieces then only add 4-6 as above follow steps 1 to 6 by adding rice noodles, soup, mushroom slices, tofu and sliced onion to each bowl to about 2/3rds full and serve.
- With a large plate for sharing in the middle, have the bean sprouts, chilli, thai basil, Vietnamese mint on this so people can add those ingredients to their own liking. This is how it is served in many restaurants.
- Add small handful of bean sprouts into the middle of the soup, these will partly submerge but should sit on the rice noodles so some will stay out of the soup
Assembling the Soup – Managed Presentation
- As per the help yourself method follow steps 1 to 6 by adding noodles, soup, mushrooms and tofu to the bowls to about 2/3rd full and then;
- Add small handful of bean sprouts into the middle of the soup, these will partly submerge but should sit on the rice noodles so some will stay out of the soup
- Garnish with a small sprig of thai basil and some Vietnamese mint
- Serve the chopped chilli on the side
To eat the soup, dip the pieces of tofu, mushroom, cabbage or cauliflower if you’ve added those in the hoisin or chilli sauce, or both and enjoy.
NOTES
- Don’t assemble the soup (i.e. add the noodles) until you’re ready to serve. DON’T store this with the noodles in the broth, well you can, but the noodles keep absorbing liquid and then start breaking down, it just ends up a sodden mess. Keep any leftover components separate so you can make more bowls later.
- You can add some shitake powder to give the broth a bit more oomph. Where does one get shitake powder, you make it yourself. Use a blender, nutribullet, coffee grinder etc., something with a bit of power. Place 5-10 large dry shitake mushrooms in the blender, or more, or less depending how much you want. We use it in other cooking as well to add a nice umami flavour to stir fries etc. Blend it on high till it becomes granulated dust and that’s it. Store it an airtight container. Don’t make too much as you have increased the surface area of the ground shitake and it will oxidise as everything does and loose some flavour over time. We keep about 1-2 cups on hand at any point in time.
- If you leave the cinnamon in beyond the cooking process it can start to really come through strong so don’t leave it more than a day before taking it out and composting the contents.
- If you want some other ingredients because maybe you’re over tofu this week, try and select neutral additions such as cauliflower, green cabbage etc. These need blanching unless your soup is steaming hot and you can add them in for a few minutes. Otherwise blanch them for 2-3 minutes in some boiling water. Blanching them in hot water separately means they won’t effect the flavour of the soup.
- The cauliflower and green cabbage optional additions/replacements are chosen because they are bland and won’t alter the flavour of the soup.
- The charred baby corn is mainly just a visual thing, it doesn’t have a strong flavour and the baby corn we have most of the time is canned so it’s not stunning, just different.
You must be logged in to post a comment.